A VU-Meter is a line with several LEDs grouped together. This example will explain how to connect them together and how to control them with the BasicEducationShield library. You can use as many LEDs as you want, as long as Arduino has enough digital pins. In this example we will use 5 LEDs.
Materials

- 1 Arduino Uno board
- 1 Basic Education shield
- 5 LED
- 5 220 ohm resistor
- 10 jump wire
Instructions
- Connect five LEDs across the breadboard gap
- Connect a 220 ohm resistor to digital pin 2
- Connect the resistor to the long leg of the first LED
- Connect each of the digital pins 3 through 6 to a corresponding LED following the same method
- Connect the short leg of the LEDs to an Arduino GND pin using black cables
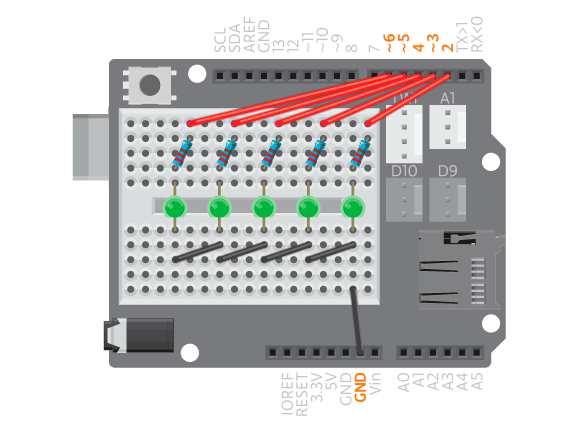
The short leg of the LED always goes to ground (GND) and the long leg to a digital pin via a 220 ohm resistor. When we connect several LEDs together, since all of the short legs are to be connected to ground they can all be connected together. But to be able to control each of the LEDs we have to connect the long legs separately to a digital pin.
Since there’re many components on the breadboard, check them carefully, so the two legs of a LED or resistor does not stay on the same line(or they get short circuited and won’t work).
Open Example>BasicEducationShield>Help>vuMeter example.
/*
VU-Meter
*/#include <BasicEducationShield.h>//Declare the VUMeter
VUMeter me;
int pins[]={2,3,4,5,6};
int pinCount=5;

void setup(){
//Configure the VU meter using parameters defined previously.
me.config(pinCount,pins);

//initialize the component. Must be called.
me.begin();

}
void loop(){
//Fill 5 LEDs
me.fill(5);
delay(3000);

//turn all the LEDs off
me.clear();
delay(1000);

//Turn the 3rd LED on
me.on(2);
delay(1000);

//Turn the 3rd LED off
me.off(2);
delay(1000);

//One LED light up at a time, scroll from left to right
me.scrollRight(700);

//And then scroll back from the 2nd on the right
me.scrollLeft(700,1);

//the 3rd led will be blinking for 10 times, each time
//with 100 milliseconds on and 100 milliseconds off
me.blink(2,100,10);

//All LEDs will be blinking 10 times
me.blinkAll(100,10);

//The 2nd to 4th LED will be light up
me.fillFrom(1,3);
delay(2000);
}
If you are using more or less LEDs than in the example remember to change “int pinCount=5” to the number corresponding to your connected LEDs.
When you’ve uploaded the code, the first thing that happens is that all LEDs are turned on for 3 seconds. The program then goes through the following functions:
clear()- turns all LEDs off.on(LEDindex)- turns one LED onoff(LEDindex)- turns one LED offscrollRight(speed, startIndex)- one LED light up at a time from left to rightscrollLeft(speed, startIndex)- one LED light up at a time from right to leftblink(LEDindex,speed, times)- one LED blinksblinkAll(speed, times)- all LEDs blinkfillFrom(startIndex, stopIndex)- turns LEDs from startIndex to stopIndex onfill(numberOfLEDs)- turns LEDs on from first to numberOfLEDs
It’s not working?
- If not all of the LEDs light up, make sure wires, LEDs and resistors are connected to the breadboard correctly. See the breadboard reference if you’re not sure how it works. Connecting components, that are not supposed to be connected, to the same breadboard line will make them short circuit.
- Make sure you have connected the LEDs to the same pins as stated in your code.
- Make sure the short legs of the LEDs are connected to GND and not the other way around.