In this mini-project, you will create a clock where the numbers are represented using photographs made of sticky notes or Post-its. To do this, you will learn how to use images in your programs and store them into arrays. We will go through this step-by-step.

-
Displaying an image
First, let’s learn how to create a program capable of displaying an image. In Processing, there is a type of variable or class called
PImage. Variables of this datatype can store an image loaded from a file by using the functionloadImage().Download the photo here.
New commands:
PImage: a datatype that can store an image.loadImage(imageFile): LoadsimageFilelocated in the data directory of the current sketch. The name ofimageFilemust be spelled out exactly. See below for instructions on how to place the file in the right folder.image(imageName, x, y): Displays the PImageimageName. The top left corner is placed at the coordinatesx,y.
-
Adding Images
For the program to have access to the image, drag and drop the image file onto the Processing IDE as shown in the following screenshot:
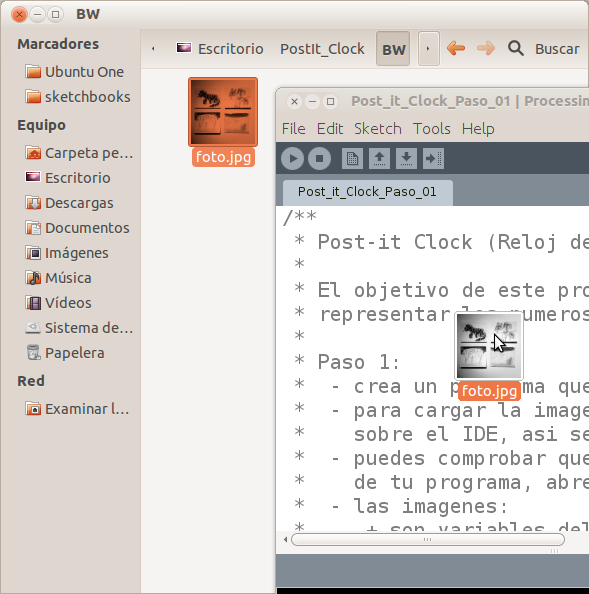
The image is stored in the program’s subfolder called data . This screenshot shows the file structure where you can find your image file. You can also find it by going to the menu ‘Sketch –> Show Sketch Folder’.

When running the program, the picture below is what you should see; a collage of four Post-it notes as the background image for your program window:
In this program we have a
PImagevariable calledim. Insetup(), we store an image calledfoto.jpginimusingloadImage(). Indraw()we display the image usingimage(). Since we set our program window to the same size as our image, the image will fit in the window perfectly. You can replace the image with another one that you take yourself or download from the internet. For best results, make sure that the image size and window size are the same. -
Displaying two images
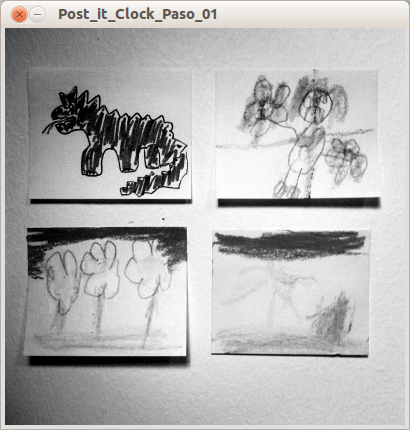
To put two pictures next to each other, you will need to declare a variable of the same type
PImage, but with a different name. You will then need to set the coordinates of the second image.Download the photos foto.jpg and foto2.jpg
Here, we’ve simply added another
PImagecalledim2. We will need to double the window size in the x axis to fit the images side-by-side. -
Arrays
When working with several images, we can use arrays to more easily access to them. An array is like a container with many compartments. Each compartment can hold different objects and can be called up by referencing that specific compartment.
For example, we can have an array called FruitContainer that has 3 compartments and can hold 3 objects. Compartment 1 has a banana, compartment 2 has a strawberry, and compartment 3 has a cherry. The numbering of arrays always start with 0. So if we look in FruitContainer[0], we’ll find the banana. Similarly, in FruitContainer[1] is the strawberry and in FruitContainer[2] is the cherry.
Arrays can be of a certain type such as an integer (
int)or a string (String). The maximum number of variables that can be stored must be declared for the array – 3 in the example above. The following program, which is a modification of the above, shows how to use a type ArrayPImageto store two images.New commands:
- The declaration of the images looks a bit different than before:
PImage im[] = new PImage[2].This means that we declare an array of the data typePImagewith two blocks (or compartments) of data. - When displaying and loading the images we will refer to
img[0]for the first container of the array andimg[1]for the second container.
Even though the programs have been changed, there is no difference between the result.
- The declaration of the images looks a bit different than before:
-
Using two Arrays
To further simplify the image variable assignment, we will store the names of the images in an array of strings. Here’s an example:
We’ve added an array of the data type
Stringwhere we store the file names of the images,String imFile[] = {"foto.jpg", "foto2.jpg"}. This means thatimFile[0]equals to “foto.jpg” andimFile[1]equals to “foto2.jpg”. When we load the images we can use the String array to get the names of the files.As you will see when you run this program, the result is again the same as the others. The big question is, Why then use this to do the same? The answer is simple – it makes it easier if we need to make changes. If you need to, changes can be made in one place and not throughout the entire program. When adding more images this becomes more important.
-
The for() loop
In this step we will increase the number of images to display from 2 to 4. We will still use 2 arrays as in the previous steps, but to make the code even more efficient we will introduce a new programming statement: the
for()loop.This is one of the most useful functions in programming. It does exactly what it sounds like – for X number of times, it loops through its statements. Let’s see the example before we explain it further.
Download the photos banana.jpg, peninsula.jpg, postit.jpg, and tortilla.jpg
New commands:
for(initializer; test; update){ statements }: This function allows you to repeat a piece of code for as many times as you need. The first thing to run is the initiating statement,initializer. In this example, it’s the declaration if an integer,i. Next, it checks if thetestis true or false, in this case ifiis less than 4 . This is similar to theifstatement in the previous project, remember? If this is true, the code within the curly brackets will be executed. Next thing that happens is theupdate, in this case it is to add 1 toi. Next thetestis checked again and if it’s still true the same procedure will follow again. Since we are always updating by adding 1 toi,iwill eventually be equal to 4 which means that thetestwill be false (4 is not less than 4). In that case the program leaves the loop.
Here is the result:

What we’ve done is to make 2 arrays with 4 positions each; one for the images and one for the image names.
Next thing we use the
for()loop will run 4 times and load each image into the array . We can use the variableito access the positions in our arrays. The first time we go through theloop(),iequals 0 which means that we load the imageimFile[0](“postit.jpg”) and store it inim[0]. Next time it loops,iequals 1, then 2, and then finally 3.Though not so obvious, the
for()loop makes the code much shorter in the long run. Imagine if we had to load 100 pictures and had to write each upload statement rather than use afor()loop. -
Multiple images
Since our objective is to create a clock, the next step is to use images to represent numbers. For your convenience, we have a series of images that have numbers made from Post-it notes.
Download the images representing the numbers 0, 1, 2, 3, 4, 5, 6, 7, 8 and 9.

No new commands are introduced here. Instead, we’ve just expanded the arrays to 10 positions. We’ve made the window size 700×95 to fit the 10 images which are 70×95 in size. The
for()loops iterate ten times –setup(), it loads the images and indraw(), it displays the images. Since the images is 70 pixels wide we can set the x coordinate of each image to70*i. -
The time
In this step we will show you how we can display the time. As we’ve mentioned before, Processing can access a number of system variables. You’ve already used
mouseX,mouseYandframeRate. There are three variables we can use to get the current time:hour (),minute ()andsecond (). Let’s get started with the time by displaying the current hour:New commands:
hour(): returns the current hour as a number from 0 to 23.int(data): Converts thedatato an integer. Egint(2.545)returns 2,int(233.9999)returns 233 etc.
The first thing we do in
draw()is to store the number of the hour in the variableh. The hour is a two digit number but our images only contains one digit each so we need to calculate which digits to display. The first digit is stored inh_decand calculated withint(h / 10). The second digit is stored inh_uniand calculated withh - h_dec * 10.Say that the current hour is 14. This means that
hequals 14,h_decequals 1 andh_uniequals 4. These values are then used to decide which image to display. -
The final clock
This is the last step of this project. In this step we will add minutes and seconds to our clock using the same method as in the previous step with the hours.
New commands:
minute(): returns the current minute as a value from 0 to 59.second(): returns the current second as a value from 0 to 59.
We declare variables for the minutes and seconds and calculate what digits to display similar to the previous step.
Experiment further
- Using the system variables of time, create a kitchen timer/countdown image clock.