Now we’re going to learn about a special analog sensor. The Light Dependent Resistor (LDR) is a sensor that detects the amount of light present. Depending on the amount of light shining on it, the sensor will return a specific analog value. You can do something really interesting things with it; make a lamp that turns on automatically when the room gets dark or a robot that follows flashlight. So, let’s get started with the basics.
Get a TinkerKit LDR and a TinkerKit wire and connect them together. Then connect the other end of the wire to the A1 three pin connector on the Basic Education shield.
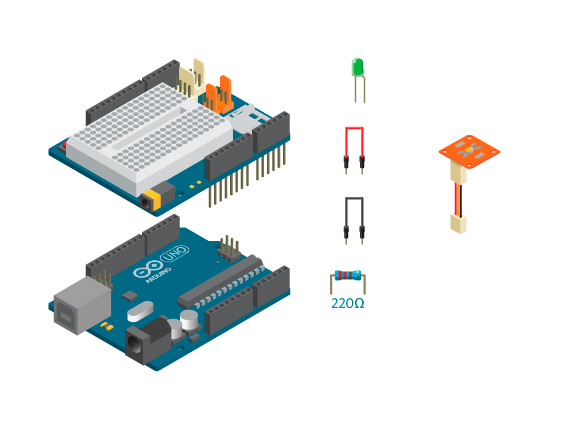
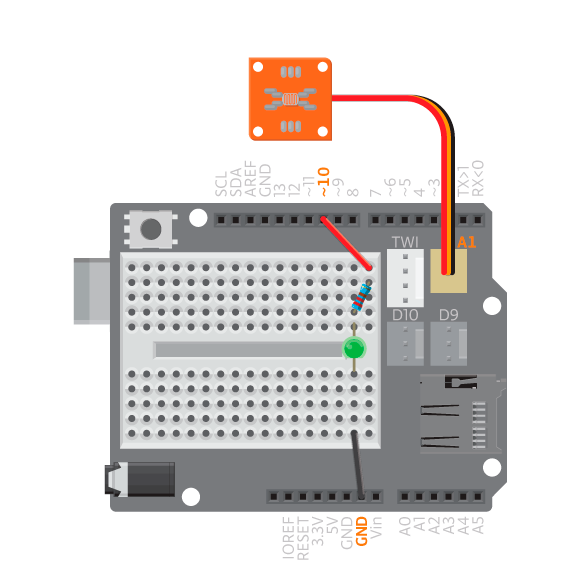
Now take a LED and a 220ohm resistor and connect them to pin 10 as described in previous exercises.
Upload the code below and experiment around with the LDR. Point it towards a light or cover it with your hand. Note how the LED behaves.
int ledPin=10;
int ldrPin=A1;

void setup() {
//nothing here
}

void loop() {
int ldrValue=analogRead(ldrPin);
int ledValue=map(ldrValue,0,1023,0,255);

analogWrite(ledPin, ledValue);
delay(10);
}
The commands used above:
map(value, fromLow, fromHigh, toLow, toHigh): Re-maps a number from one range to another.valueis the value we want to map.fromLowandfromHighare the lowest and highest value thatvaluecan be. In this case from 0 to 1023.toLowandtoHighare the lowest and highest value we want. In this case 0 to 255.
We use analogRead() to read the value of LDR, which ranges from 0 to 1023. Then we use map() function to transform the value so that the new value is proportionately equal to a value in between 0 and 255. If ldrValue is 0 ledValue will be 0, if ldrValue is 1023, ledValue will be 255, if ldrValue is 512 ledValue will be 127. Once the value has been mapped, we use it to light the LED. The LED will get dimmer or lighter depending on the amount of light the LDR detects.
Experiment Further
- Make the automatic lamp we mentioned previously. When the LDR reading is lower than a certain value or threshold, the light turns on. Above that value, it turns off. Use an LED to simulate a lamp.
- Remember the Beep example from last week? Make it work with a LDR! Remember to map the values correctly.
Sensor calibration
An LDR is a sensor heavily influenced by its environment. That is to say, a project with LDR will work differently in different places because the amount of light present in different settings. You will probably have to calibrate your LDR depending on the location to ensure that it works.
Let’s take the automatic lamp for example. Say we want to trigger it when a piece of paper covers the LDR.
You’ll need to experiment with different thresholds so that it triggers with the piece of paper. Once you figure out the threshold, move the LDR under the table and try to see if the paper will trigger it there. Will it still work?
Likely, it won’t work and that’s the problem. The paper does not change the LDR reading that much when there is already too little an amount of light such as under the table. The way to solve this is to be able to change the threshold dynamically.
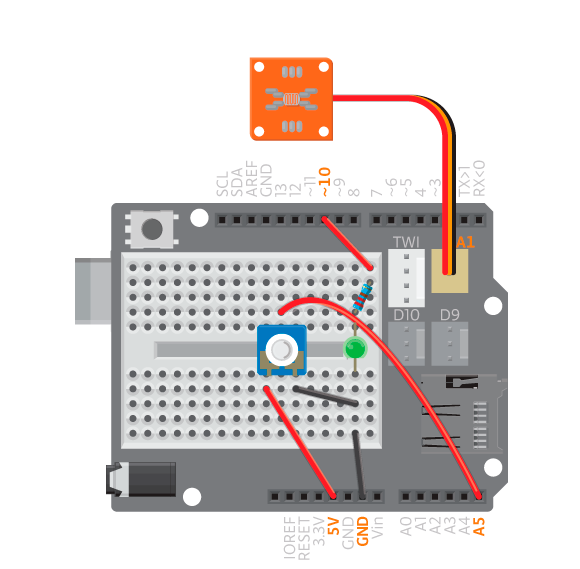
Find a potentiometer and connect it to analog A5 as you did in previous exercises. Now, map the analogRead() value of potentiometer to 0~255, and use that as the threshold.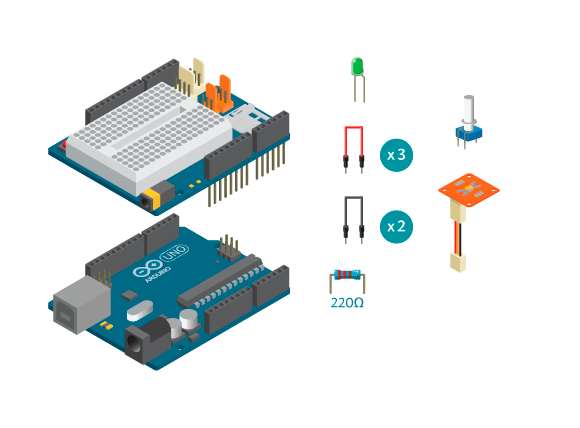
int ledPin=10;
int ldrPin=A1;
int potPin=A5;

void setup() {
pinMode(ledPin,OUTPUT);
}

void loop() {
int ldrValue=analogRead(ldrPin);
int threshold=analogRead(potPin);

if(ldrValue>threshold){
digitalWrite(ledPin,LOW);
}else{
digitalWrite(ledPin,HIGH);
}
delay(10);
}
Now, instead of adjusting the code, you can instead turn the knob until the paper triggers the LDR. Then try it again under the table and you’ll see how simple and useful a potentiometer with mapped values can be.
You’ve just learned a way to calibrate analog sensors. Use it wisely when building your own projects!