The joystick is one component but uses two analog sensors and gives you two values. One x value and one y value. The value for each direction is zero if it’s in the middle, -1 on one side and 1 on the other side.
Materials

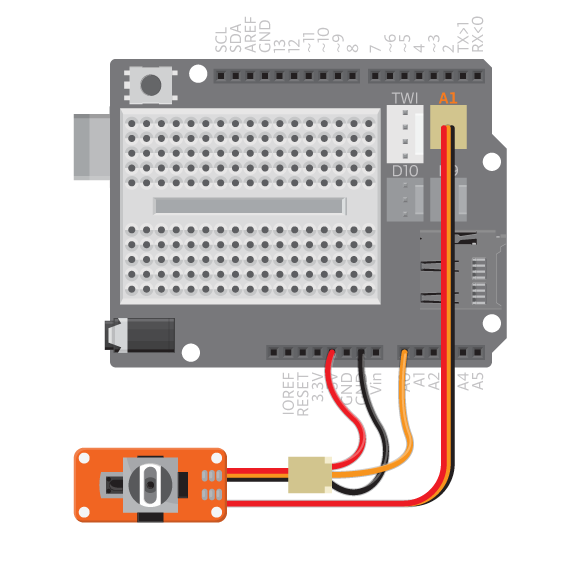
- 1 Arduino Uno board
- 1 Basic Education shield
- 1 Tinkerkit joystick
- 2 Tinkerkit wire
- 3 jump wire
Instructions
- Connect one of the TinkerKit wires to the Joystick where it says “Y”.
- Connect 1 red jump wire to the red wire in the tinkerKit wire and to 5V.
- Connect 1 black jump wire to the black wire on the tinkerkit wire and to ground.
- Connect the last jump wire to the TinkerKit wire and to analog pin A0.
- Connect the second TinkerKit wire to the joystick and to TinkerKit port analog A1 on the shield.
Open Example>BasicEducationShield>Help>Joystick example.
/*  Joystick
*/

#include <BasicEducationShield.h>

//The joystick uses two analog pins. One for X and one for Y.
Joystick me=Joystick(A1,A0);

void setup(){
Serial.begin(9600);
}
void loop(){
Serial.print("X: ");
Serial.print(me.getX()); //Get the X value and print it.
Serial.print("  Y: ");
Serial.println(me.getY()); //Get the Y value and print it.
delay(200);
}
Open the Serial monitor to see if the joystick is working in both directions. It will print “0″ for each value if it’s in the middle, -1 on one side and 1 on the other.
It’s not working?
- First make sure that the connections between the joystick, wires and board are correct.
- Make sure you have connected the joystick to the same pins as you stated in your code.
- There are three small LEDs on the back of the joystick that lights up when the button is connected(These lights will light up even if you only connected one of the connectors). One to show that it’s getting power, one for X and one for Y. If you are sure that it is connected correctly and the LEDs still don’t light up, the joystick is probably broken.
Note: Remember NOT to use analog pin A4 or A5, if you’re using the Basic Education Shield.