A capacitive sensor is made up of a high resistance resistor (1Mohm in this example) and a piece of conductive material (tin foil in this case). It can be used as a touch sensor. You can either use it as an analog sensor and read analog values from it or as a switch. The sensor need to be connected through a separate bread board otherwise electronics on the shield can interfere with readings.
Materials
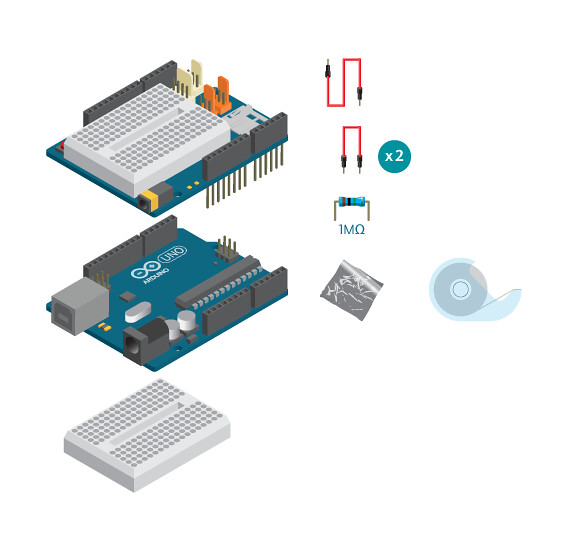
- 1 Arduino Uno board
- 1 Basic Education shield
- 1 Bread board
- 1 1m ohm resistor
- 3 jump wire
- tin foil
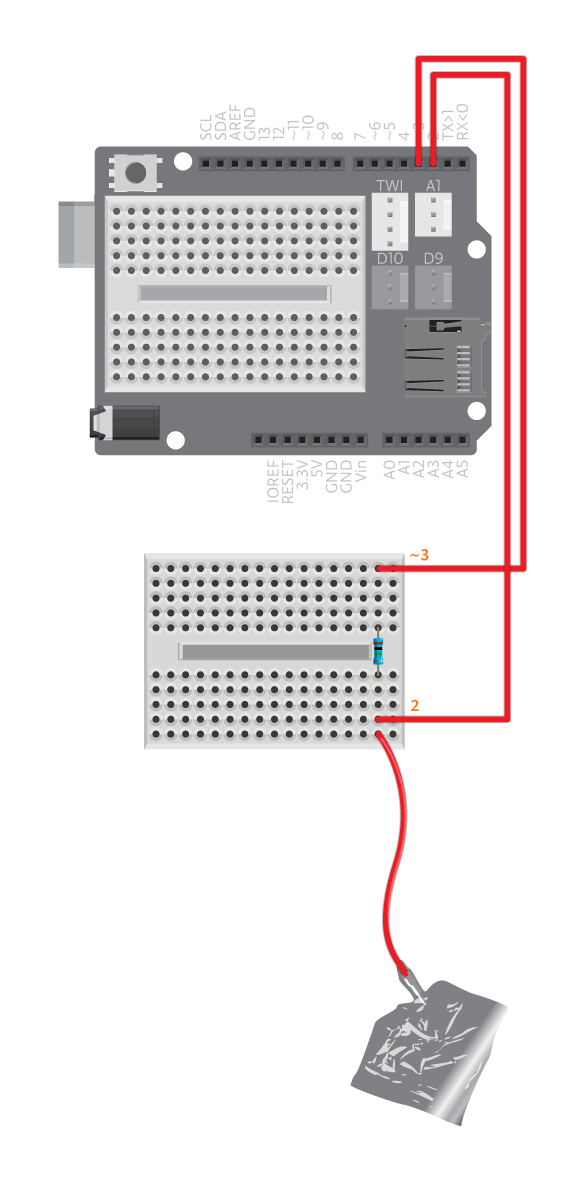
Instructions
- Connect a wire to pin 2 and one wire to pin 3.
- Connect a 1m ohm resistor between pin 2 and pin 3.
- Connect pin 3 with a loose cable
- Cut a piece of tin foil, attach it to the loose cable with tape (Make sure the metal parts have good connection)
Reading Sensor Values
Upload the CapacitiveSwitchTest example:
/*
CapacitiveSwitch Test
*/

#include <CapacitiveSensor.h>
#include <BasicEducationShield.h>

//The sensor is connected between 2 and 3 by default
CapacitiveSwitch me=CapacitiveSwitch(2,3);

void setup(){
Serial.begin(9600);
}
void loop(){
//Print out the value of the sensor
me.test();
delay(30);
}
Open the Serial monitor to make sure the sensor works. What you see now are the values read from the capacitive sensor. If nothing is touching the sensor, the value should be less than 10 most of the time, and jumps up to 1000 plus if you press it hard.
It’s not working?
- If the reading is not normal, double check your connection. Take extra care of the connection between tin foil and the loose cable, they loose contact easily.
- Make sure you have connected the sensor to the same digital pins as stated in your code. In
CapacitiveSwitch(2,3)2 is the sending pin and 3 the receiving pin. This means that the loose end should be connected to pin 3.
Note: Make sure the two digital pins you use are between 2 and 8. With Basic Education shield on, digital pins 9, 10, 11, 12 or 13 are not usable for capacitive sensors.
Switch
If you want to use the capacitive sensor as a switch, you need a threshold value. Write down the value you get when nothing touches the tin foil and the value when you touch it with a desired object.
Upload the CapacitiveSwitch example:
/*  CapacitiveSwitch
*/#include <CapacitiveSensor.h>
#include <BasicEducationShield.h>//The sensor is connected between 2 and 3 by default
CapacitiveSwitch me=CapacitiveSwitch(2,3);

void setup(){
Serial.begin(9600);
me.config(400);
}
void loop(){
Serial.println("Please press...");
//Wait until the capacitive sensor is pressed.
Serial.println(me.pressed());

delay(1000);

Serial.println("Please release...");
//Wait untill the capacitive sensor is released.
Serial.println(me.released());

do{   //Print values bigger than 10. Print 0 otherwise.
Serial.println(me.getValue(20));
}while(true);
}
In setup with the line me.config(threshold), replace threshold with a number between the two values you wrote down previously. The default is 400, in most cases it wouldn’t need to be changed, unless you need to use something other than finger to touch the sensor.
Open the serial monitor and follow the printed instructions to see if it works. Each time you execute an instruction the serial monitor will print “1″.
You can use multiple touch sensors on one Arduino. The sender pin(digital pin 2 in this case) can be shared.